You don’t need a dedicated room or a massive budget to have a great home bar. What you do need is a clear plan — and that’s exactly what most guides skip over.
A lot of people assume a home bar requires a large footprint, a full wall of cabinetry, and maybe even a sink. But when we analyzed hundreds of compact bar setups shared on design forums like Houzz and r/malelivingspace, the most-admired examples weren’t the biggest — they were the most intentional. Bars tucked into a living room corner, mounted on a single wall panel, or hidden inside a repurposed console cabinet consistently outperformed sprawling setups in both style and daily usability.
If you’ve been trying to figure out how to create a functional home bar in a small space, this guide walks you through everything: how to pick the right format, what to actually stock, and which storage solutions work in the real world — not just in magazine photoshoots. By the end, you’ll have a clear path forward with no wasted money and no overcrowded corners.
Why Compact Home Bars Are Often More Functional

Here’s something that surprises a lot of people: a thoughtfully designed compact bar is frequently more practical than a sprawling one. When your footprint is limited, every decision becomes deliberate. You’re not spreading tools and bottles across a 10-foot counter — everything you need is within arm’s reach while you’re mixing.
The mental framework that makes this work is simple: a home bar isn’t a room, it’s a zone. You’re carving out a dedicated area — even if it’s just 24 inches wide — where everything related to drinks lives. That boundary is what makes a small bar feel complete rather than scattered.
Based on our review of compact bar builds shared across design communities, small bars also tend to stay organized longer than large ones. There’s no room for excess, so people stock and maintain them more deliberately. The result is a bar that genuinely reflects how someone drinks — not an aspirational collection that gathers dust.
One more practical upside: working within a tight footprint pushes you toward smarter products. Wall-mounted stemware racks, under-shelf hanging systems, tiered bottle risers — these are tools that high-end commercial bars use not for aesthetics alone, but because they genuinely maximize usable space. Constraints breed better decisions.
Choosing the Right Bar Setup for Your Space

Before you buy a single bottle rack, you need to decide which bar format actually fits your lifestyle. This is where most people go wrong — they choose a setup that looks great in photos but clashes with their space or hosting habits.
Bar Cart
A bar cart is the most flexible option for apartments and smaller homes. It can be rolled out for entertaining and tucked flat against a wall the rest of the time. When evaluating carts, user reviews consistently flag two features as non-negotiable: lipped edges to prevent bottles from sliding during movement, and locking caster wheels — a detail many buyers overlook until their cart rolls during a pour.
Storage is the real limitation here. A two-tier cart realistically holds 5–8 bottles, a shaker set, and a few glasses. It’s ideal if you entertain with a focused, limited menu. If you want to offer a full cocktail selection for a larger group, a cart alone won’t cut it.
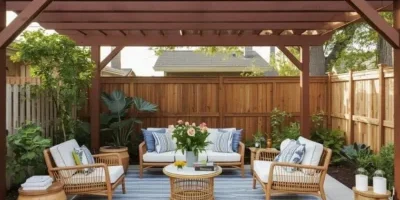
Console or Sideboard
A slim console table (look for 12–14 inches deep) or low sideboard can serve beautifully as a bar surface without reading as a dedicated bar at all. The top becomes your work area — a small cutting board, the bottles in current rotation, and an ice bucket — while interior drawers or cabinet space below handles glassware, backup bottles, and tools.
This format integrates naturally into a living or dining room and is particularly well-suited for people who want their space to look like a home first and a bar second.
Wall-Mounted Bar
Wall-mounted bars are consistently the most space-efficient format, and they’re underused outside of design-forward apartments. A fold-down wall bar gives you a functional work surface that disappears completely when closed. A floating shelf system — shelves above for bottles, a pegboard for tools, and an under-shelf rail for hanging glassware — can pack surprising capacity into a 24–36-inch wall section.
The tradeoff: installation is more involved. You’ll need to locate studs, and the wall space is permanently committed to this function. For renters, a freestanding alternative is usually smarter.
Dedicated Bar Cabinet
A bar cabinet (also called a drinks cabinet or cocktail cabinet) is a freestanding unit with a self-contained system: interior bottle storage, a fold-out work surface, and built-in space for glassware. When closed, it reads as a handsome piece of furniture.
For renters or anyone who moves frequently, this is often the highest-value format. It’s portable and self-contained, and it comes in widths starting at around 20 inches — narrow enough for tight corners. Because updating a small space with the right furniture can transform how the whole room feels, a well-chosen bar cabinet earns its place as both a functional and visual anchor.
Storage Solutions That Actually Work in Tight Spaces

Once you’ve chosen your bar format, storage becomes the central challenge. Here’s what consistently performs in real compact setups — not just in staged interiors.
Go Vertical Before Going Wide
Analysis of small-bar builds on Houzz and apartment design subreddits shows a clear pattern: the most functional setups always maximize vertical space. The moment you add a second or third shelf above your work surface, storage capacity can double or triple without claiming another inch of floor space.
In practice, mount open shelves at 10–12-inch intervals above a console or sideboard. Add a pegboard panel for hanging tools — jiggers, strainers, peelers, bottle openers, channel knives. Use S-hooks. Every item that hangs is an item that doesn’t clutter your counter.
Under-Shelf Stemware Racks
These are one of the most overlooked storage tools in compact bars. Under-shelf racks mount to the underside of a shelf and hold wine or cocktail glasses by the stem — inverted, completely stable, and completely out of the way. A standard rack holds 6–8 glasses in a space that would otherwise be dead air between shelves. They typically cost $12–$25 and require no tools to install.
Tiered Bottle Risers
Lining bottles up in a single flat row wastes the depth of any shelf — and puts the bottles at the back out of sight and reach. Tiered risers (two-step or three-step acrylic or bamboo versions work well) let you see every label and reach any bottle without moving others. This matters more than it sounds: visibility directly affects what you actually use.
Tool Organization Inside Cabinets
Bar tools have an infuriating tendency to scatter — jiggers slip behind bottles, muddlers roll to the back of shelves, and hawthorn strainers disappear entirely. A shallow drawer fitted with a simple divider tray, or a small organizer basket mounted inside a cabinet door, keeps everything in a fixed spot. The goal is that any tool should be findable in under three seconds during a pour.
Much like the organizing logic behind any small-space storage system, the principle is the same: assign every item a specific home, make that home make sense, and the whole system maintains itself.
What to Stock (and What to Skip) in a Small Home Bar

This is the section most bar guides get backward. They present a 40-item shopping list framed as “the essentials” — advice that only applies if you have a dedicated room and a dedicated budget. In a compact bar, restraint is a feature, not a limitation.
The Core Five Spirits
Based on International Bartenders Association (IBA) official cocktail classifications, five core spirits cover the overwhelming majority of classic drinks:
- Bourbon or rye whiskey — Old Fashioned, Manhattan, Whiskey Sour, Paper Plane
- London Dry gin — Martini, Negroni, Gin & Tonic, Tom Collins, Last Word
- Blanco tequila — Margarita, Paloma, Tequila Sour, Tommy’s Margarita
- A clean, mid-range vodka — Vodka Soda, Moscow Mule, Cosmopolitan, Espresso Martini
- Dark or aged rum — Dark & Stormy, Daiquiri, Rum Sour, Mai Tai
With these five, you can make well over 30 IBA-recognized classic cocktails before adding a single liqueur. That’s a meaningful data point — it means your bar is genuinely functional from day one, not aspirationally functional.
Two Liqueurs That Unlock the Most Drinks
- Triple sec or Cointreau — Margaritas, Sidecars, Cosmopolitans, Corpse Revivers
- Campari — Negronis, Americanos, Jungle Birds, Paper Planes
Resist the pull of novelty liqueurs. A bottle that only works in one drink is a space cost that rarely pays off in a small bar.
What to Skip Until You’re Ready
- Multiple expressions within the same spirit category (three whiskeys before you’ve built a routine with one)
- Large 1.75L bottles until you know your consumption rate
- Single-use flavored spirits
- Sparkling wine stored at room temperature — it needs refrigeration and a plan for finishing quickly once open.
Mixers Worth Having on Hand
Keep these in a refrigerator if possible, or in a compact countertop cooler:
- Club soda and tonic water in cans (they stay fresh longer than open bottles and avoid the flat-mixer problem)
- Simple syrup — a homemade batch (1:1 sugar to hot water) costs under $1 and lasts 3–4 weeks refrigerated.
- Fresh lemons and limes, bought as needed rather than stocked in bulk
- Angostura bitters and orange bitters — both come in small bottles, last years, and dramatically expand your cocktail range.
Lighting and Styling: Making Your Bar Look Designed, Not Assembled

A bar that looks like an afterthought — bottles crowded onto a shelf with no visual cohesion — won’t feel welcoming regardless of how well it’s stocked. But a compact bar with intentional lighting and styling consistently draws people in the moment they enter the room. Here’s what the difference actually looks like in practice.
Lighting Is the Single Highest-ROI Upgrade
When we looked at before-and-after bar setups shared across Reddit and interior design boards, lighting was the single most transformative change — more than new furniture, new glassware, or a rearranged layout.
A warm-white LED puck light, a small spotlight, or LED tape under shelves aimed at the bottles makes an immediate visual impact. Target 2700K–3000K color temperature — this range makes glassware sparkle and spirits glow amber in a way that cooler whites (4000K+) completely miss. The cost is typically under $30, and the installation takes under 20 minutes.
Display Glassware as a Visual Element
In a compact bar, glassware isn’t just functional — it’s part of the aesthetic. A set of four clear rocks glasses displayed on the work surface or hanging from an under-shelf rack looks intentional. You don’t need 12 pieces; four glasses of two or three types covers most situations and reads better visually than a crowded full set.
Apply the Rule of Odd Numbers
Interior designers consistently apply this principle to styled surfaces: odd-numbered groupings read as more natural and visually interesting than symmetrical pairs. A cluster of three bottles, a single cocktail shaker, and one small object (such as a plant, a stack of coasters, or a small tray) creates genuine visual interest. This same principle applies whether you’re styling a coffee table or arranging a bar shelf — good design thinking is consistent across the whole room.
Protect the Work Surface
The fastest way to make a small bar look disorganized is to let tools and random items accumulate on the work counter. The surface is for mixing — not storage. Every item that isn’t in active use should have a dedicated spot elsewhere. A consistently clear counter signals intentionality. It also makes the bar dramatically easier to use.
Common Mistakes That Waste Space (and Money)

After reviewing dozens of real apartment bar builds and community threads, the same mistakes recur. Avoiding them from the start saves both money and frustration.
Overbuying Spirits Before Establishing a Routine
The single most common mistake documented in home bar communities: buying eight spirits, twelve liqueurs, and a full tool set before making a single drink at home. The result is a crowded shelf, a bottle of vermouth that went bad before it was finished, and half-empty specialty bottles that haven’t been touched in months.
Start with the core five spirits. Add based on what you actually make, not what sounds appealing in the store. User feedback from Houzz discussions consistently shows that people who start focused and expand gradually end up with more functional — and more satisfying — bars than those who try to build everything at once.
Choosing Specialty Glassware Too Early
Early investment in specialty glassware takes up disproportionate space and rarely pays off at the compact-bar scale. One type of glass can handle multiple functions. A stemless wine glass works fine for a Negroni on the rocks. A rocks glass serves Old Fashioneds, Negronis, and casual wine service. A coupe handles Daiquiris, Sidecars, and Manhattans up.
Four rocks glasses and four stemless wine glasses cover the vast majority of real-world hosting situations. That’s eight pieces — far more manageable than a full specialized set.
Ignoring Dead Space
Dead space — behind tall bottles, above short ones, in corners, inside cabinet doors — accumulates in a small bar faster than it appears to. In real-world setups, this “lost” space typically represents 20–30% of total available storage. Use tiered risers and bottle cradles to fill the shelves’ depth and height. Fit the inside of cabinet doors with small racks or hooks for bitters bottles, peelers, or a bar spoon.
Skipping a Defined Work Zone
Without a deliberately defined work surface, mixing becomes chaotic — you’ll find yourself moving bottles, hunting for a clear spot, and making drinks on whatever space happens to be available. Even a 12×18-inch cutting board placed in a consistent spot creates a functional work zone. Protect it: nothing lives there permanently.
Budget Breakdown: What a Small Home Bar Actually Costs
This is one of the most-searched questions about home bars and one of the least honestly answered. Here’s a realistic breakdown across three tiers:
| Category | Budget | Mid-Range | Elevated |
| Bar furniture (cart, cabinet, or shelves) | $80–$150 | $200–$400 | $500–$1,200 |
| Core 5 spirits | $100–$130 | $150–$200 | $200–$350 |
| Two starter liqueurs | $25–$35 | $40–$60 | $60–$100 |
| Bar tool set (shaker, strainer, jigger, spoon) | $20–$35 | $40–$70 | $80–$150 |
| Glassware (8–12 pieces, 2 types) | $20–$40 | $50–$90 | $100–$250 |
| Mixers and bitters | $15–$25 | $25–$40 | $40–$60 |
| Lighting | $10–$30 | $30–$80 | $80–$200 |
| Total Estimate | ~$270–$445 | ~$535–$940 | ~$1,060–$2,310 |
A genuinely functional, well-styled small home bar is achievable for under $500. Most of the best compact bars documented in design communities started at the budget tier and upgraded selectively over time — which is also the better organizational approach, since you learn what you actually need before spending on it.
Conclusion
Building a functional home bar in a small space is not a compromise — it’s an exercise in intention. The bars that work best in tight quarters are the ones where every choice was deliberate: the right format for the space, a focused spirit selection, storage that uses vertical space properly, and lighting that makes the whole thing feel considered rather than collected.
Start focused and curated. Let the bar grow as you learn what you actually make and what you genuinely enjoy. The goal isn’t an impressive-looking shelf — it’s a space you find yourself gravitating toward, whether you’re making a Tuesday evening Old Fashioned or hosting a dinner party for eight.
You don’t need more square footage. You need a clearer plan.
Ready to Set Up Your Home Bar?
Start with the format that fits your living situation — cart, cabinet, wall-mounted, or console. Stock the core five spirits. Pick up a Boston shaker, Hawthorn strainer, and a jigger. Then spend one afternoon setting up your storage, defining your work surface, and adding a warm light source. The whole setup can come together in a weekend.
Related reading that pairs well with this guide:
- How to Make a Small Kitchen Look Expensive on a Budget
- Modern Dining Room Lighting Ideas That Transform Your Space
- How to Style a Coffee Table Like an Interior Designer
Have a question about your specific layout or setup? Drop it in the comments — we’re happy to help you think through the right approach for your space.
Frequently Asked Questions
What is the minimum space needed for a home bar?
- A functional home bar can fit in as little as 12–18 inches of wall width using a wall-mounted fold-down surface or a single floating shelf above a narrow console. A more comfortable working setup typically needs 24–36 inches. The key variable is height, not width — a well-organized vertical setup dramatically outperforms a wider but shallower one.
Do I need a sink in my home bar?
- No, and this misconception stops more people from building a home bar than almost anything else. The vast majority of well-functioning home bars don’t have plumbing. A small pitcher of clean water for rinsing bar tools between uses, a dedicated ice bucket with a lid, and proximity to a kitchen sink handles everything you’ll actually need for home entertaining. From a hygiene standpoint, rinsing tools with clean water and drying them promptly is sufficient for home use — the same standard most people apply to any kitchen tool. A sink becomes worth considering only if you’re doing a full built-in renovation and the plumbing is already accessible.
What’s the most important bar tool to buy first?
- A two-piece Boston shaker and a Hawthorn strainer. These two items cover the mechanical requirements for most classic cocktails. A jigger (measuring tool) is a very close third; imprecise measurements are the most common reason home cocktails taste inconsistent. A cobbler shaker (the three-piece kind with a built-in strainer) is easier to learn on, but experienced home bartenders typically prefer the Boston shaker for speed and better seal.
How do I keep a small home bar organized over the long term?
- Assign every item a fixed home and return it to that home after use — that single habit does more for long-term organization than any product. Use tiered risers for bottles, a small tray or hook system for tools, and under-shelf racks for glassware. Keep the work surface completely clear between uses. A monthly 10-minute audit — removing unused items, noting what’s running low — keeps things from gradually drifting back toward clutter.
Can a studio apartment realistically have a home bar?
- Yes — and studio apartments are actually well-suited to compact bars because the limited space enforces focus from the start. A bar cart or dedicated bar cabinet works particularly well: both are freestanding, don’t require installation, and can be repositioned as needed. In studio setups documented on apartment design forums, common successful placements include: behind the sofa along a wall, in a corner between the kitchen and living area, and as a room divider with storage function on both sides.
What’s a good starter cocktail list for a small home bar?
- With the five core spirits and two liqueurs covered in this article, you can confidently make every cocktail on this list: Old Fashioned, Manhattan, Whiskey Sour, Gin Martini, Negroni, Tom Collins, Gin & Tonic, Margarita, Paloma, Tequila Sour, Vodka Soda, Cosmopolitan, Dark & Stormy, and Daiquiri. That’s 14 distinct drinks — a legitimately impressive range for any hosting situation, and every one of them is an IBA-recognized classic with a clear, tested recipe.